Enter General Posting for Ledger Group (FB01L)
Menu: Accounting > Financial Accounting > General Ledger > Document Entry > Enter General Posting for Ledger Group
Process Overview: Post a transaction record when specifying the Ledger. All kinds of transactions can be posted from here. Here's the example of posting a general transfer document.
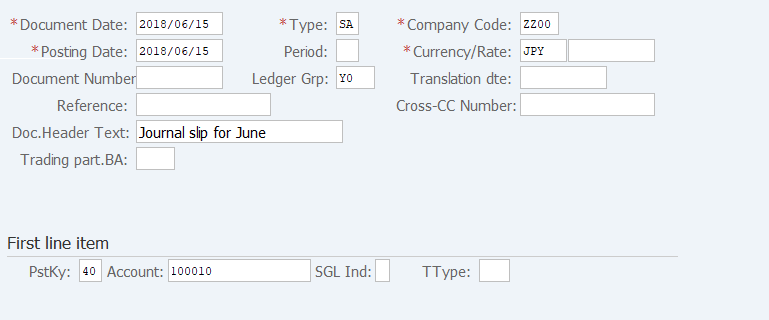
Screen 1:Enter Header info. & Posting Key of the first item, Account code.
Operation Process:
| 1. | {{Document Date}} | Enter any date. (Used as a substitute of a memorandum.) | |
| 2. | {{Type}} | Enter the code for classifying the document. (Ex. 'SA' G/L account document) | |
| 3. | {{Company Code}} | Enter the Company code for managing the document. (Normally, own company code) | |
| 4. | {{Posting Date}} | Enter the document management date. (Ex. Enter '2018/06/xx' for the document of June 2018.) | |
| 5. | {Period} | Enter the accounting period for managing the document. (Calculated automatically based on the posting date) | |
| 6. | {{Currency}} | Currency code for managing the item amount. Change if the operation is a foreign currency entry. (Ex. 'JPY' Japanese Yen) | |
| 7. | {Rate} | Enter the Rate when entering a foreign currency. (Not required for the local currency) | |
| 8. | {Ledger Grp} | Specify a ledger of the posting target. (If no information is entered, transactions are posted to all the ledgers.) | |
| 9. | {Doc.Header Text} | Enter the document abstract. (Ex. 'Account transfer for month XX') | |
| First line item | |||
| 10. | {{PstKy}} | Enter the item management key of the 1st item. (Ex. '40' Debit entry) | |
| 11. | {{Account}} | Enter the Account code of the 1st item. | |
| 12. | Press [Enter] key. | ||
Supplement :
| 1. | The Posting Key determines whether the account input field is for a Customer account or a Vendor account. |
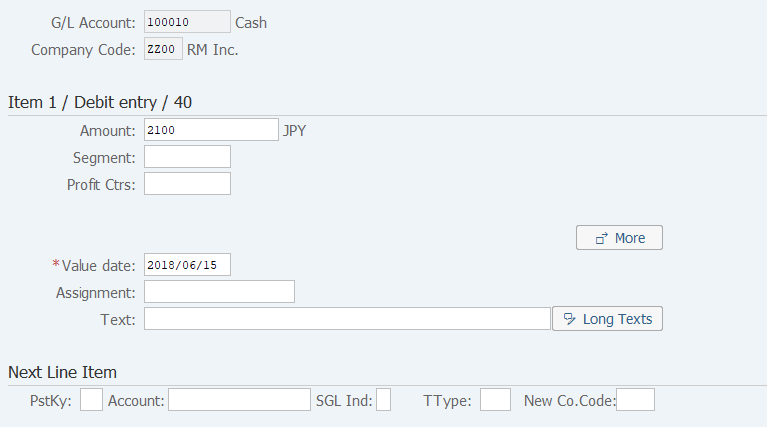
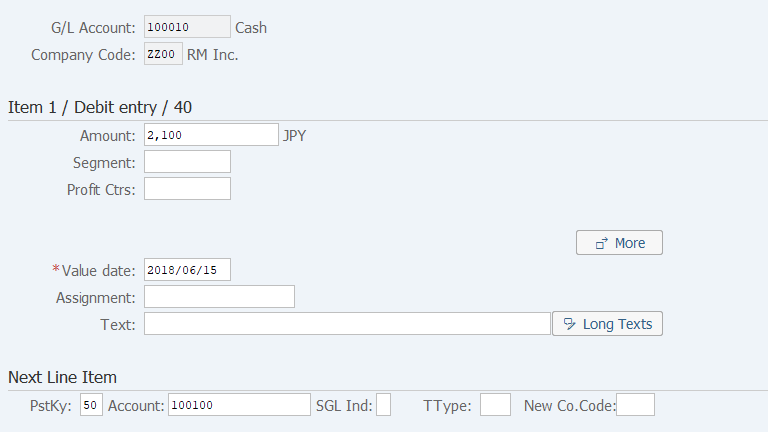
Screen 2: Enter the amount, organizational info, to the first item.
Operation Process:
| 1. | {{Amount}} | Enter the Item amount. | |
| 2. | {Calculate tax} | If a flag is set, the consumption tax is calculated automatically. A taxed amount is entered for the amount. | |
| 3. | {Segment} | Enter the Segment. | |
| 4. | {Profit Ctrs} | Enter the Profit center of the item. | |
| 5. | {{Value Date}} | Enter the date used as the baseline of interest calculation. (Used for cash or a bank account code.) | |
| 6. | {Assignment} | Enter the report display Assignment. | |
| 7. | {Text} | Enter the item abstract. (Ex. 'Account transfer for month XX') | |
| 8. |  |
Click [More]. |
Supplement: For a transaction of a Corporate group company, entry of the trading partner (Code of the corporate company code) is necessary.
| 1. |  |
Click [More Data]. |
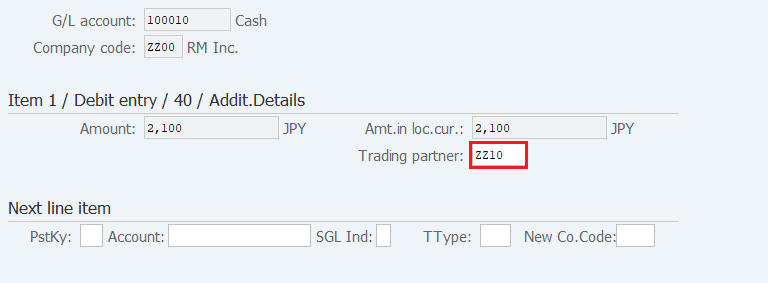
| 2. | {{Trading partner}} | Enter the trading Partner code. |
Supplement :
| 1. | The screen configuration varies according to the account code that was entered in the previous screen. |
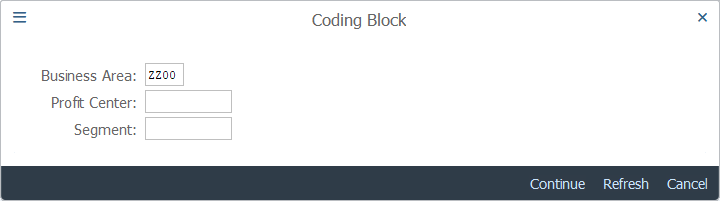
Screen 3: Enter an additional info for the first item.
Operation Process:
| 1. | {{Business Area}} | Enter the Business area of the item. | |
| 2. |  |
Click [Continue]. |
Screen 4: Enter Posting key, Account code for the second item.
Operation Process:
| Next Line Item | |||
| 1. | {{PstKy}} | Enter the item management key of the 2nd item. (Ex. '50' Credit entry) | |
| 2. | {{Account}} | Enter the Account code of the 2nd item. | |
| 3. | Press [Enter] key. | ||
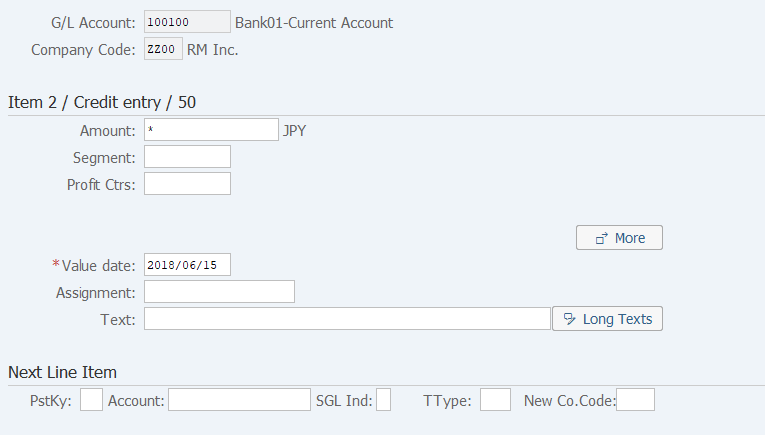
Screen 5: Enter amount, organizational info. For the Second item.
Operation Process:
| 1. | {{Amount}} | Enter the Item amount. (For the final item, when '*' is entered, the balance amount is input automatically.) | |
| 2. | {{Value Date}} | Enter the date used as the baseline of interest calculation. (Used for cash or a bank account code.) | |
| 3. | {Assignment} | Enter the report display Assignment. | |
| 4. | {Text} | Enter the Item abstract. (Ex. 'Account transfer for month XX') | |
| 5. | |
Click [More]. |
Screen 6: Enter organizational info. As an additional info of the second item.
Operation Process:
| 1. | {{Business Area}} | Enter the Business area code for the item. | |
| 2. | {Segment} | Enter the Segment. | |
| 3. | |
Click [Continue]. |
Screen 7: Confirm the entry in Second item & move to Document overview screen.
Operation Process:
| 1. |  |
Click [Display Document Overview]. |
Supplement :
| 1. | When there is a next item, repeat the procedure of Screen 4 to 6. |
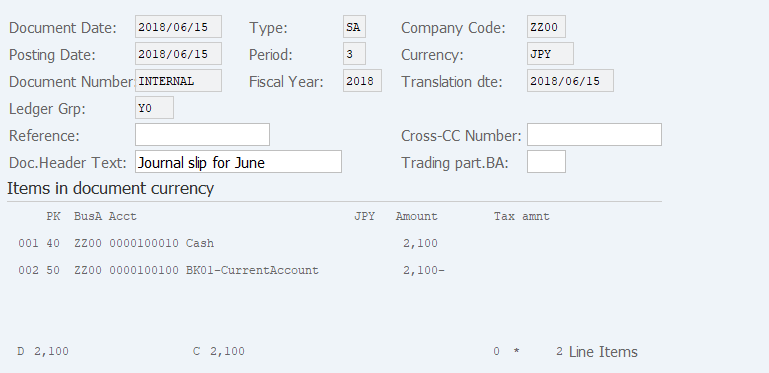
Screen 8: Confirm the entry on Document overview screen before saving the data.
Operation Process:
| 1. | Menu: Document > Simulate (The overview of the document to be posted can be checked through simulation.) | ||
| 2. |  |
Click [Post]. |
Copyright(c) MITSUI KINZOKU YOURSOFT Inc.